cloudwoud
Control an IoT device based on Microsoft Graph API data. Azure Logic Apps and Azure Functions make it easy!
by Rik Groenewoud
Intro
One thing I learned in the last couple of months, is that things escalate quickly at Xpirit. A great example is the complete webshop for our Xpirit swag that evolved from the simple question how we could get swag on-demand. Or the extraordinary 10+ course diner at the innovation day I talked about in my last blog.
Another example was the Christmas gift of 2021. For the full story read the article “The epic story of Blinky” in our magazine but in short: from someone suggesting during lunch to do something creative and crazy this year as a christmas gift, it escalated to a hand-crafted wooden LED IoT device called “Blinky”. The device works on wifi and is managed through Azure IoT hub. Together with the device came some cool workshops from our IoT team to learn the fundamentals of IoT and on what Azure has to offer in the IoT realm. Of course there was plenty of time to play around and to figure out what we could make Blinky do through code.
Since I joined Xpirit only since April, I was lucky there was a spare one left and so I also became the proud owner of this epic device:

For those interested; in the heart of the device lives a ESP8266 NodeMCU and it runs on Arduino. Please follow the links if you want to know more.
My idea
Inspired by all kinds of cool use cases from my colleagues such as:
- make the LEDs go pulsing like Kit from Knight Rider
- turn Blinky on when you are in a live Teams call
- Change the color of Blinky based on the room temperature
I also came up with an idea of my own. What if could get a warning signal when I have an appointment in my Outlook Calendar? Since I do not always have my Outlook open, there is always the risk of missing a Teams call or any other appointment. An extra visual warning would be a great help! My idea was to give Blinky a pulsing red light when an appointment is within 5 minutes of its scheduled start time.
Sketch and outline of the solution
I came up with the following infrastructure to make this happen:
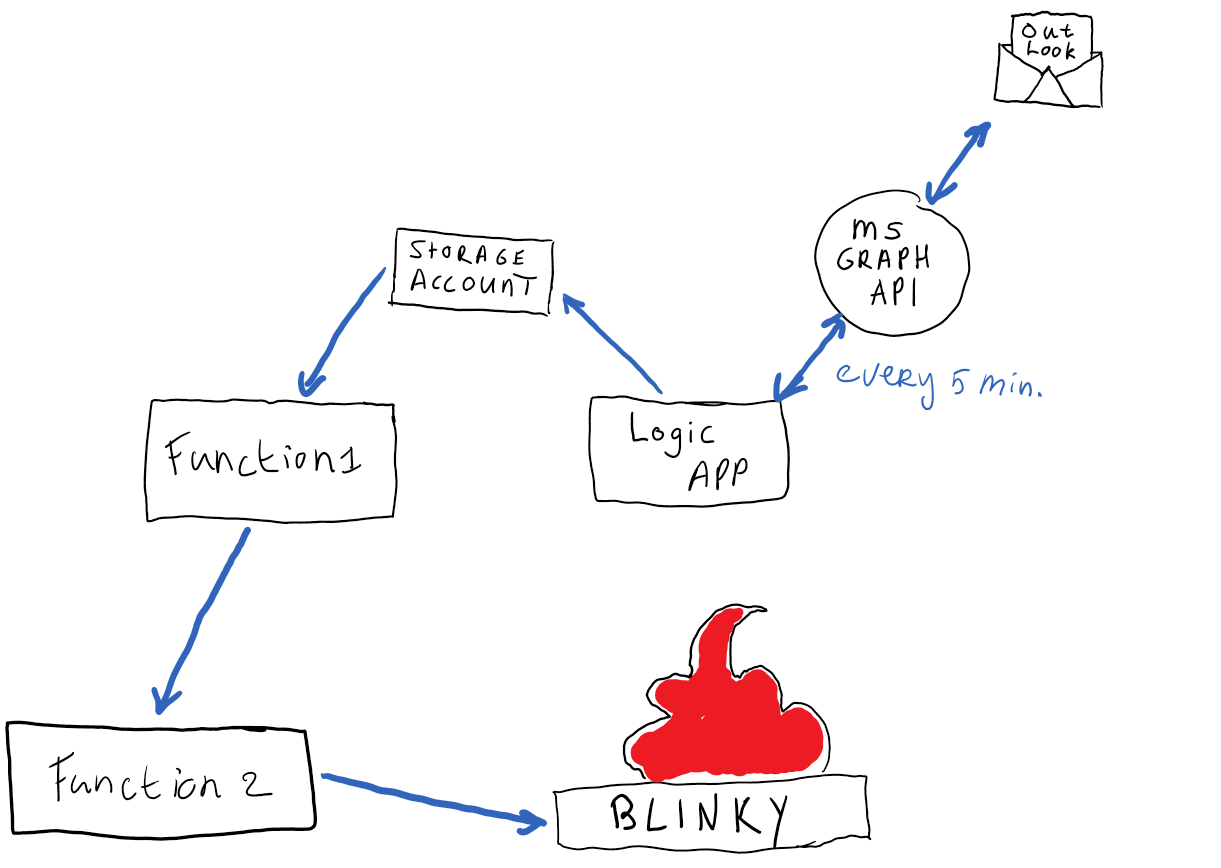
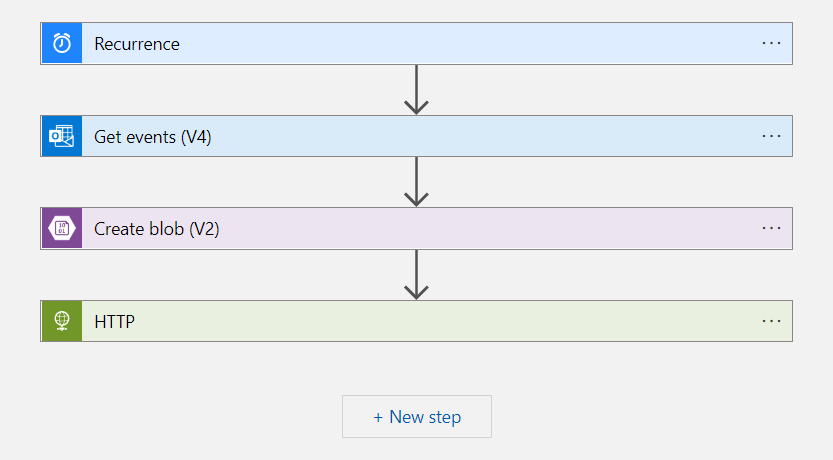
- I use a Logic App to authenticate with my Outlook Calendar and retrieve all my appointments via the Office 365 Outlook “Get Events” action. This action leverages the Microsoft Graph API to get the data in. This Logic App runs every minute.
- Next, I put the retrieved JSON file with all my appointments to a storage account.
- Finally the logic app sends a POST request to the Function 1 to let it know it can grab new data from the storage account.
The next step is to pick up this raw data and do some calculations on it. This happens in the Function 1. Using Powershell it picks up the data from the storage account and calculates if there are appointments within 5 minutes. Based on the results it sends a POST request out to the second Function. Below you see the script of Function 1 (the script that I actually wrote myself):
using namespace System.Net
# Input bindings are passed in via param block.
#param($request, $TriggerMetadata)
param(
    $request
)

#Variables
$container = 'calendarevents'
$blob = 'events.json'
$storageaccountname = 'rgautomationeuwebaac'

# Write to the Azure Functions log stream.
Write-Host "The CheckCalenderEvents function received a request: $request."

#Get storage account key
$keyvault = 'kv-automation-euwe'
$secret = Get-AzKeyVaultSecret -VaultName $keyvault -Name "storagekey" -AsPlainText

#Get data from storage account
$context = New-AzStorageContext -StorageAccountName $storageaccountname -StorageAccountKey $secret
Get-AzStorageBlobContent -Container $container -Blob $blob -Destination ./events.json -Context $context -Force
$data = Get-Content .\events.json | ConvertFrom-Json
$data = $data.value

# Filter for future events
$result = foreach ($d in $data) {
    $today = Get-Date -AsUTC
    $d.start | Where-Object { [datetime]$_.DateTime -GE $today }

}
Write-host "Result: $result"

#Calculate if there are events within 5 minutes. If so change state of Blinky to red pulse, if not so turn off Blinky
foreach ($r in $result) {
    $t = $today - [datetime]$r.DateTime
    Write-Host $t

    if ($t.TotalMinutes -GT -5) {
        $body = '{
            "deviceId": "<device-id>",
            "mode": 2,
            "brightness": 255,
            "saturation": 255,
            "hue": 7
        }'
        Invoke-WebRequest -Uri 'https://func-updatetwin.azurewebsites.net/api/' -Body $body -Method PUT
        break
    }

    else {
        $body = '{
            "deviceId": "<device-id>",
            "mode": 0,
            "brightness": 255,
            "saturation": 255,
            "hue": 7
        }'
        Invoke-WebRequest -Uri 'https://func-updatetwin.azurewebsites.net/api/' -Body $body -Method PUT
    }
}

# Associate values to output bindings by calling 'Push-OutputBinding'.
Push-OutputBinding -Name Response -Value ([HttpResponseContext]@{
        StatusCode = [HttpStatusCode]::OK
        Body       = $body
    })
Lastly, the Function 2 contains the code that actually sends the configuration of the LEDs towards Blinky. Based on the body of the POST request it either sends the config for a pulsing red light, or it turns Blinky into mode 0 which effectively turns the light off. This works because my Blinky is registered in Azure IoT Hub. In this solution lives the “digital twin” of the physical device where the Azure Function 2 can talk to. By calling the digital twin it sends the config for the LEDs towards the physical device itself (using wifi).
Conclusion
What I think is cool about this little project, is that with some easy-to-use tools like the Logic Apps and Azure Functions, I made my plan a reality with no advanced coding skills required. When I started thinking about how this should work, I was struggling with how to authenticate to my personal Calendar and thought about writing one big script to do all the work. The moment I took a step back and looked at what Azure had to offer out-of-the-box, it turned out I could do this simpler, secure and surprisingly stable as well: since this application is live it kept on running ever since!
To me this is the power of the low code solutions within the Azure ecosystem: Let Azure do the work for you and make powerful cloud computing solutions accessible for everybody.
tags: microsoft - azure - iot - logicapps - azurefunctions - powershell